Today in my painting class I talked about Plein Air painting over the summer break. So I thought I’d share the shelf palette I showed everyone.
When painting in Plein Air it is useful to have your palette set ahead of time so as not to take too much time getting set up in the field as the light is changing before your eyes. You want to get into painting right away so minimizing set up time is an advantage.

It is also useful to minimize the weight you carry into the field. So the ability to have a wide range of colors without having to carry a lot of paint tubes is a plus.
Using a Shelf Palette for Plein Air painting can help solve both of these issues.

Here’s how I made the shelf palette:
Materials:
Here’s what you’ll need:
- a thin, lightweight cigar box about 2″ thick. I used one I had laying around.
- a sheet of glass a wide as the box. I used glass from a picture frame I got at a thrift shop. Get some extra glass to practice cutting if you haven’t used a glass cutter before. There are excellent videos on YouTube that show how to do this.
- a glass cutter
- perhaps some pliers and/or gloves to grip the glass for cracking the edge
- a thin marker like a Sharpie for marking the glass
- a ruler
- an Exacto knife or sharp box cutter
- fine-grit sandpaper or emery board
- cardboard or a cutting mat to protect your tabletop while working
Method:
Mark the edges of the cigar box where you want the shelves to be, placing one mark for the top of the shelf and another for the underside. This is done in the deeper box section (not the lid) and you want to make sure to evenly space them. (I included one on the top and bottom as well so that I could put paint there and easily clean it off regardless of which way I hold it.) I cut 6 for my box.
Make sure the measurement will accommodate the glass sliding into place without being too loose and that it will be deep enough in the side of the cigar box to support the glass. About 1/8 inch into the sidewall will do but it also depends on how your box is constructed. A snug fit is what you are after. Cut out a section of the wood where you have marked using an Exacto knife or sharp, thin box cutter. You can smooth the edges with an emery board or piece of sandpaper.

Measure the width of the box from the inside of the cuts you made for the shelves to get an exact measurement for how long the glass shelves will be. Measure the depth each shelf will be. The shelves should not stick out beyond the lip surrounding the edge. On mine, the lip is a bit higher than the box edge to facilitate the lid closing so that’s how deep I could go.
With a glass cutter, score and break the glass. Lightly sand the edges of the glass with fine-grit sandpaper so as not to cut yourself using the box since the edges can be quite sharp.

Next slide in the glass. I suggest you use gloves. If the fit is too snug there is a chance the glass will crack and you don’t want to cut yourself. Now you are all set.

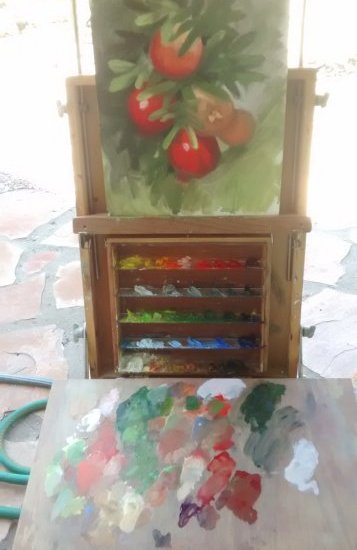
I use the box lid for mixing paint or I rest the shelf palette against my Yarka easel lid with the cigar box lid underneath a larger palette as you can see in this picture.

Now you’re ready to load the palette with paint. You can use a wide variety of paints from the tube or pre-mix colors and values within color families to have ready for you in the field. You can load the shelf palette before heading into the field to paint and leave all those tubes behind.
If you make a cigar box shelf palette, please post a picture of it in the comments and let us know how it went.
Happy painting.